

Shot Putt
The throw is made from a 2.135-metre circle with a 1.22-metre wooden stop board (10 cm high) at the front. The thrower must commence the throw from a stationary position and leave the circle under control from the rear half after completing the throw. The shot must fall within a 40-degree sector at the front of the circle. The shot must be put from the shoulder with one hand only and be kept close to the chin during any preceding movements.
The Grip
The shot should be placed at the base of the first three fingers, evenly spread but not stretched, with the little finger and thumb supporting the shot. The shot is then placed under the chin with the elbow held high.
To test the grip and give the athlete confidence - stand with feet shoulder-width apart, facing the direction of the throw. Using the arm only, push the shot out, ensuring that the elbow is kept high. The next step is for the athlete to twist their upper body to give further force to the shot and then move on to flexing the legs.
The Stance
|
|
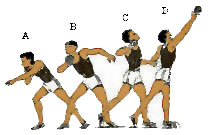
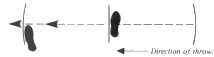
The athlete should take up the position as in Figure 1A with the weight over the right foot and should be encouraged to think of "chin-knee-toe" as vertically in line. The feet and hips should be facing the side (at right angles to the shoulders) and the shoulder "cocked" to the rear. The width of the stance will vary according to the height of the athlete, but the feet should be aligned as in Figure 2. Note the position of the left hand and arm in Figure 1 A.
The Putt
From this standing position (Figure 1A), the movement should be initiated by the right leg driving the right hip to the front (Figure 1B & C), transferring the body weight from the right leg to the left leg (Figure 1C). At the same time, the left arm comes forward and up, pointing along the trajectory line the shot will take (approx. 45° to the horizontal). During this action, the emphasis should be on a fast right hip, keeping the elbow up behind the shot.
As the hips face the front and forward, the right shoulder is driven to the front and the left arm swings to the left side to balance the movement. When the chest is facing forward, the right arm punches the shot up and forward, keeping the elbow high (Figure 1D). The left shoulder must not be allowed to drop during any part of this movement, and the athlete should think of keeping the left side braced.
Movement into the putt
The problem here is not to achieve movement across the circle to arrive at the putting position (Figure 1A) but how to ensure that the movement adds to the efficiency of the putt. There are two accepted techniques - the shift and the rotation.
The shift - Stand at the back of the circle facing away from the throwing area with the hips and shoulders parallel. The weight is placed on the right foot with the trunk low. The athlete then hops back on the right foot towards the stop board and rotates the hips at right angles to the shoulders. The right foot lands with the trunk low and the weight over the right foot. The left foot lands close to the stop board with the body in the initial putt position (Figure 1A) and the feet position as in Figure 2.
The rotation - The approach is similar to the discus turn. Balance is essential, and again the rotation process must bring the athlete to the basic putt starting position (Figure 1A)
Optimum Distance
The distance achieved in the shot is dependent on three parameters:
- The height of release of the shot.
- The angle of release of the shot.
- The speed of release of the shot.
The parameter that has the most significant effect on the potential distance is the speed of release of the shot.
Optimum Release Angle
Research (Bartonietz 1995)[1] has shown that the athlete cannot throw at the same speed for all projection angles. With ballistics, the same initial speed is applied to the projectile regardless of the projection angle. As the angle increases, the speed decreases. This decrease in speed is a result of two factors:
- As the angle increases, the athlete must expend more energy in overcoming the shot's weight, so less effort is available to develop the release speed of the shot.
- The structure of the body favours a throw in the horizontal direction.
Each athlete has a unique release velocity and release angle combination that depends on their size, strength, and throwing technique. Each athlete has their own specific optimum release angle. Bartonietz (1995)[1] identifies that the optimum release angle for a world-class shot-putter maybe 33.5° ±7.5°.
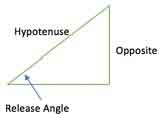
Visually determining the Angle of Release
The distance from the shoulder to the elbow (let us say 25cm) is approximately the same as the distance from the:
Now for trigonometry - in a right-angled triangle, the Sine of the release angle is the "opposite" divided by the "hypotenuse". The "opposite" is the height from the shoulders to the head (25cm), and the "hypotenuse" is the length from the shoulder to the wrist (50cm).
Roughly we would expect, on release, the wrist to be in line with the top of the head or just slightly higher when viewed from the side. |
 |
Specifications
The weight specification for the shot depends on gender and age.
| Gender \ Age | 11-12 | 13-14 | 15-16 | 17-19 | 20-34 |
| Male | 3.25 kg | 4 kg | 5 kg | 6 kg | 7.26 kg |
| Female | 2.72 kg | 3 kg* | 3 kg* | 4kg | 4kg |
* British Athletics changes of implements for 2014
| Gender \ Age | 35-49 | 50-59 | 60-69 | 70-79 | 80+ |
| Male | 7.26 kg | 6 kg | 5kg | 4kg | 3kg |
| 70-74 | 75+ | ||||
| Female | 4kg | 3kg | 3kg | 3kg | 2kg |
Training Programs
A training program has to be developed to meet the athlete's individual needs and consider many factors: gender, age, strengths, weaknesses, objectives, training facilities etc. As all athletes have different needs, a single program suitable for all athletes is not possible.
Training Pathway

Athletes in the Event Group stage
The following is a basic annual training program suitable for athletes in the Event Group Development stage:
Athletes in the Event stage
The following is an example of a specific annual training program suitable for athletes in the Event development stage:
Rules of Competition
The competition rules for this event are available from:
References
- BARTONIETZ, K. and BARTONIETZ, A. (1995) The throwing events at the World Championships in Athletics 1995, Remoting - Technique of the world's best athletes, Part 1: shot putt and hammer throw. New Studies in Athletics, 10 (4), pp. 43-63
Page Reference
If you quote information from this page in your work, then the reference for this page is:
- MACKENZIE, B. (2001) Shot Putt [WWW] Available from: https://www.brianmac.co.uk/shot/index.htm [Accessed