

Pole Vault
The pole vault is the most technical of athletic events. Therefore, considerable time should be spent on understanding and perfecting the technique. The vault can be broken up into different sections, which can be worked on individually. All instructions refer to a right-handed athlete.
Pole selection
Your weight determines the appropriate pole to use. Never use a pole rated below your body weight.
The Grip
A grip area from 6" to 18" (inches) from the top of the pole is the range the pole is made to bend and respond efficiently. Pole manufacturers place a red band around the top of the pole to indicate the top of the recommended grip range.
All fibreglass poles have a natural bend which indicates the direction in which the pole bends most efficiently. When vaulting, the vaulter grips the pole in such a way that the pole will bend naturally when planted into the box. The label should face the vaulter on a UCS spirit pole as they take off.
Holding the pole parallel to the ground, grasp the pole with the left-hand palm down and the right-hand palm upwards. The right hand should be approximately 12" from the top of the pole, and the hands should be around shoulder-width apart.
The Approach and take-off point
A 10 or 12-stride approach can be used.
The take-off point can be determined by placing the tip of the pole in the box. Hold the pole with the appropriate grip and hand position. Position yourself so that the right arm is fully extended vertically, and the left foot is placed directly below the right hand. The left foot marks the take-off point.
Run up, and Pole carry
The run-up should begin from a standing start with no preliminary 'run on steps' as this leads to possible inconsistency. The pole should initially be held vertically, right hand at the hip and the left hand 10 centimetres in front of the left side of the chest. (Fig 1) The first step should not be too long to sink but should have a high bounding type motion. You must maintain an upright and forward posture. As your speed increases, the tall posture is exaggerated as much as possible by the legs being as straight as possible as the ball of the foot contacts the ground. |
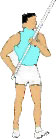 Fig 1 |
The pole should be lowered gradually throughout the run-up using the left hand as a pivot and by controlling the rate of fall with the right hand that moves from the hip to a point halfway between the waist and arm-pit. The left hand remains static and must not drop. (Fig 2) While running, the hips should be very high. |
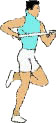 Fig 2 Fig 2 |
Transfer
The pole is lowered gradually throughout the run-up. Three strides from take-off
- The pole should be parallel to the ground and at chest height (Fig 4).
- The right hand should be close to the right arm-pit, the left hand just in front of the chest.
- The left hand should always stay above the left elbow to enable the pushing action.
The transfer takes place over the last two strides and the key is that the arms lead the legs (Fig 3, 4 & 5). On the penultimate left foot contact, both arms move to forehead height, and the left arm must not lag. (Fig 3 & 4). Before the right foot hits the ground, the right arm should be at a 90-degree angle with the hand, just above and in front of the head (Fig 5). The left arm should be at a slightly greater angle with the hand at eye height. This position allows the best support for the pole. As the take-off leg (left) comes through and drops for the final contact, both arms straighten simultaneously, and the right knee is driven forcibly upwards. (Fig 6).
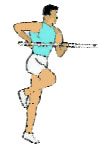 Fig 3 |
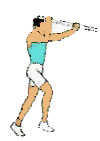 Fig 4 |
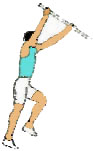 Fig 5 |
Take Off
You must take off with as much forward speed as possible, but your body must be as extended as possible so that the pole is as near to vertical as can be. Both arms should be straight, the right directly above the head. As the take-off foot extends, the pole should hit the back and bottom of the box just before leaving the ground. According to Houvion (1985), the position of the take-off point to the top hand is the one element that can determine the success or otherwise of the vault. The consensus between coaches is that the take-off foot should be located directly beneath the top hand (Fig 6). |
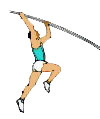 Fig 6 |
Flight Phase
This is an essential vault phase, particularly for those with a high grip. The drive should be through the chest, as in the long jump. Consequently, the chest should lead with the left leg held back. The top arm will trail deliberately to allow this position, and the shoulder joint must be mobile enough to accommodate this action. Both arms must be very strong but not rigid, with the left elbow turned out slightly to allow the chest through.
Note: It is important not to lock or push deliberately with the left arm during the flight phase, as this forces the chest backwards. If not, the resulting drive will be through the hips, and the legs will swing prematurely.
Hang & Push-Press
Your objective is to maintain the run-up's speed and push the pole to the vertical.
- Allow the chest to move forward but keep the hips back, thereby keeping the centre of gravity behind the push action of the arms.
- The left arm must not be rigid but turned outwards slightly.
- The right arm must be straight and should be left behind.
- The left leg should also be straight and hung back, producing an arc from the right hand to the left foot with the chest forward.
- The right leg (femur) should be at a 90-degree angle to the left femur, and the right foot should be high and close to the centre of gravity.
- Both arms initially push upwards and continue that move. Press forwards, influencing the pole bend. At the same time, the left leg starts to swing forward.
- The hips remain back.
- The push-press action of the arms should be maintained as long as possible.
Swing & Extension
Ideally, your centre of gravity remains as low as possible until the bend of the pole is at its greatest to gain maximum horizontal distance. Aim for a high centre of gravity as the pole recoils to gain maximum vertical distance.
Leg swing
- Swing the back leg through straight until parallel with the ground.
- The right femur remains at a 90-degree angle to the back leg throughout the swing.
- The angle between the left (back) leg and the body is also 90 degrees.
- The centre of gravity is still low, but the legs are in a good position (45 degrees from vertical).
- The arms must still push-press the pole even after a maximum bend.
Hip swing
- It starts around the time of the maximum bend of the pole.
- Move the hips forward as the bent leg straightens and joins the already straight leg.
- You should be in a pike position with feet together, and both arms should still be straight.
- The feet should be directly above the head.
Although separate, both swings should blend and join to provide a smooth movement.
- As the arms are still straight, the pole recoil is slowed, allowing you to get into the ideal position.
- Open the pike position and relax the left arm as the speed of the recoil increases.
- Drop the head and shoulders back to a natural alignment with the body.
- You should be as inverted as possible.
- Maintain a 'tight' posture.
Turn & Clearance
- The turn should be delayed gaining maximum vertical height.
- Once turned 90 degrees and facing the side, the pole may still be bent, but you should still be directly in line with the pole.
- Stay as close to the pole as possible.
- Let go of the pole with the left hand and complete the turn.
- Extend the right arm and become an extension of the pole.
- Once the vertical speed has dropped pike to rotate around the bar.
The basic technique to look for:
Run up
- Maximum controllable speed.
- Eyes on the box.
- Knees high.
- Running tall.
- Posture erect.
- Correct handhold.
Plant
- Standing tall and straight.
- Arms in position early.
- Straight left arm - not locked.
- Knees come through fast.
- Right arm straight above the head.
- Left foot take-off.
- Right knee drive to the athlete's right side of the pole.
Swing
- Stay down on the pole.
- Right arm stretched.
- Left arm tight.
- Right knee up fast.
- Driving straight ahead.
- Stay away from the pole.
- Eyes focused on the right hand or pole tip.
Rock back
- Knees back and up.
- Eyes on feet or pole tip.
- Right arm stretched.
- Left arm collapsing.
Clearance
- Hips thrust.
- Arm pulling on the pole.
- Body turning.
- Arms pushing on the pole.
- Body arching over the pole.
- Push the pole away.
Training Programs
A training program has to be developed to meet the athlete's individual needs and consider many factors: gender, age, strengths, weaknesses, objectives, training facilities etc. As all athletes have different needs, a single program suitable for all athletes is not possible.
Training Pathway

Athletes in the Event Group stage
The following is a basic annual training program suitable for athletes in the Event Group Development stage:
Athletes in the Event stage
The following is an example of a specific annual training program suitable for athletes in the Event development stage:
Rules of Competition
The competition rules for this event are available from:
Page Reference
If you quote information from this page in your work, then the reference for this page is:
- MACKENZIE, B. (2004) Pole Vault [WWW] Available from: https://www.brianmac.co.uk/polevault/index.htm [Accessed