

Hammer Picture Sequence
Picture sequence of the hammer throw - comments by Max Jones (1990)[1].
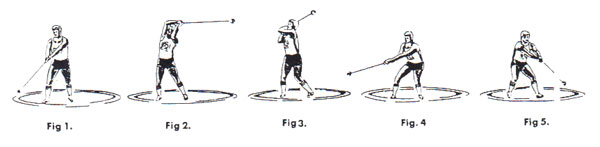
Swings: In Fig. 1, the hammer approaches the low point just off the athlete's right foot. The arms are long and relaxed, with the legs slightly flexed. The hips are moving across to counter the pull of the hammer (Fig. 2). As the hammer approaches its high point (Figs. 2 and 3), the hips have moved to the thrower's right to counter the pull of the hammer. As the hammer passes in front of the athlete, the arms are long, but as it reaches behind the head, the arms are quickly bent, and the torso turns to catch the hammer at the very end of the swing. Only the shoulders turn. The head, hips, knees and feet remain facing the rear of the circle. It is usual to perform two preliminary swings, followed by a third swing from which the entry into the turns is executed. At the end of the last swing, just before the low point is reached, the athlete's hips and weight should be moved slightly over the left heel (Fig. 4) with the arms long and low and the knees slightly flexed. As the hammer passes the right foot, the athlete should turn with the hammer (Fig. 5).
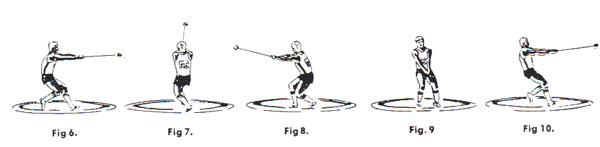
Entry: The entry should not be rushed, so concentrate on keeping it at the same speed as the second swing. The entry should be smooth and long, with the right foot not breaking contact with the ground until the hammer is well on its way to its high point (Fig. 6). The athlete will have formed an isosceles triangle with his shoulders and arms, providing the longest possible radius for the turns, especially if the shoulders are relaxed. The head must remain fixed, looking at the hammerhead.
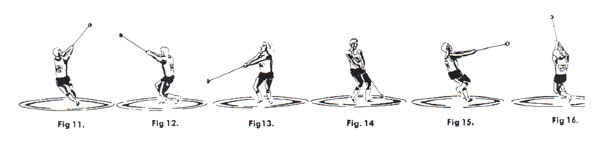
Turns: The athlete in the sequence uses three turns, but most world-class throwers use four turns. As the hammer travels around the athlete's left side (Fig. 5), the athlete will turn on the right ball and the left foot's heel. There is a total weight transfer onto the left toe as the high point is reached (Fig. 7, 11, 15). At the high point (Fig. 7, 11, 16), the athlete should keep the radius as long as possible. The right foot, which comes off late (Fig. 6,10,15), makes a close, quick step over to land facing the hammer (Fig. 8,12,17).
The athlete must stay on the hammer, not lead it, and feel the acceleration of the hammer. Early left heel contact is vital, as is the continuous turning of both knees bent in the double support phase. The speed of the hammer increases with each turn. The following technical points should be emphasised:
- Keep the shoulders relaxed and the arms long at all times.
- Make sure that the hammer is long at the high point.
- The left leg should be flexed throughout the turns.
- There should be a vigorous pumping action of the right leg, which is kept tight to the left thigh.
- Once the right foot has grounded, work both legs by twisting the knees around in the direction of the throw.
- Catch the hammer early (Fig. 8,12,17) so that the double support phase is long.
- Keep the torso erect throughout the throw.
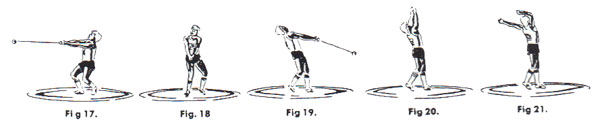
Delivery: Start the delivery as soon as the right foot makes ground contact (Fig. 17) at the end of the final turn. The hammer should be caught high and to the right. The athlete should continue to turn their legs and torso from this position, beating the hammer down to its low point (Fig. 18) with the athlete's legs remaining flexed. When the hammer reaches its low point, the athlete straightens their legs explosively and blocks and stiffens the left side (Fig. 19). There should be a strong vertical lift over a flat, stable left foot with the arms whipping the hammer away (Figs. 20-21).
References
- JONES, M. (1990) Hammer Throwing Technique. Athletics Coach, 24 (2), p. 13-14
Page Reference
If you quote information from this page in your work, then the reference for this page is:
- MACKENZIE, B. (2011) Hammer Picture Sequence [WWW] Available from: https://www.brianmac.co.uk/hammer/picseq.htm [Accessed